

5.4 - Images Formed by Lenses
Types of Lenses and Focal Points
Convex (converging) lens. Thicker in the middle than at the edges, bulging outward. Rays coming in parallel to the principal axis bend and converge toward a focal point (F) on the far side. It converges light, can make real or virtual images, and its focal point is on the opposite side from the incoming light (a real focal point).
Concave (diverging) lens. Thinner in the middle than at the edges, caving inward. Parallel rays bend and spread apart as if they came from a focal point on the same side as the incoming light. It diverges light, always makes virtual images, and its focal point is on the incoming side (a virtual focal point).
Focal points on both sides. Every lens has a focal point on each side, depending on the shape of that side. For thin lenses in air, the two focal lengths are equal in size.
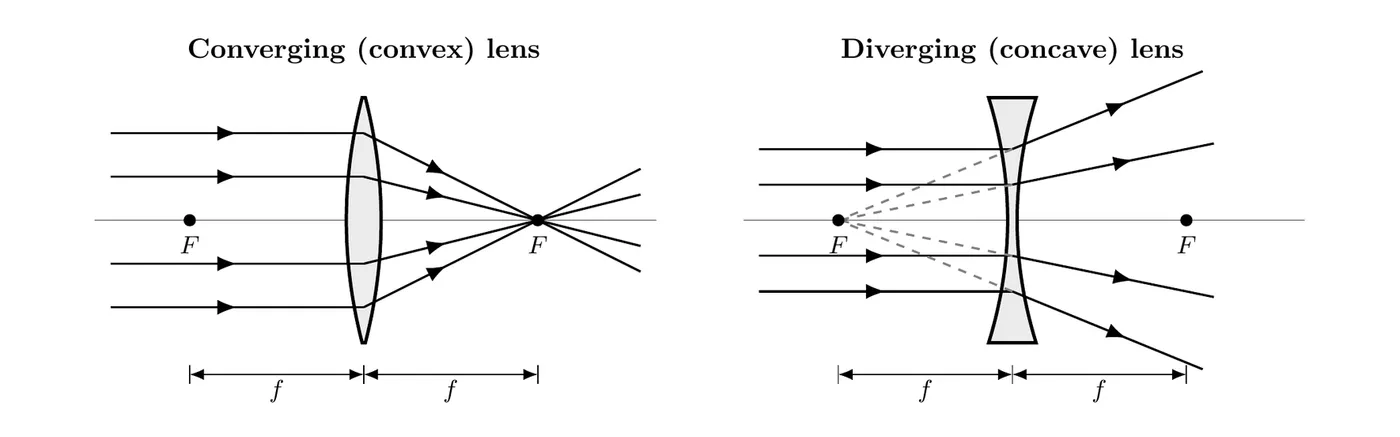
Parallel rays bend at a converging lens and meet at F on the far side. At a diverging lens they spread out as if they came from F on the incoming side (dashed). Both lenses have an F on each side, the same distance f from the lens.
The surroundings matter too. A lens bends light because its index of refraction is different from the material around it. Put the same glass lens under water ( instead of 1.00 for air) and the difference in index shrinks, so the lens bends light less and its focal length gets longer.
Real vs. Virtual Images
Real image. Forms when refracted rays actually meet at a point. The light really converges there, so you can catch it on a screen. It shows up on the opposite side of the lens from the object and is usually inverted.
Virtual image. Forms when refracted rays spread out but look like they came from a common point. The rays never actually meet, so it can’t be projected. It appears on the same side as the object and is usually upright.
Thin Lens Equation
For a thin lens, the image location depends on the focal length and how far the object is from the lens’s midline:
where:
- = object distance from the lens
- = image distance from the lens
- = focal length
It’s the same form as the mirror equation, but the sign conventions differ.
Sign conventions for lenses:
Quantity | Positive | Negative |
(object distance) | Object on the incoming-light side (real object) | Object on the far side (virtual object, rare) |
(image distance) | Image on the far side from the object (real image) | Image on the same side as the object (virtual image) |
(focal length) | Converging (convex) lens | Diverging (concave) lens |
The big difference from mirrors: for a lens, positive means the image is on the opposite side from the object (light passes through). For a mirror, positive means the image is on the same side (light bounces back).
Magnification
For a thin lens, magnification compares image size to object size:
where:
- = magnification (no units, given as an absolute value)
- = image height
- = object height
- = image distance
- = object distance
Reading the magnitude: is enlarged, is same size, is reduced. For orientation, check the sign of instead: if the image is real and usually inverted, and if it’s virtual and usually upright.
Signed version. If you’d rather let a sign tell you the orientation, the signed form from the mirror page (5.2) works for lenses too: . A negative means inverted (a real image, ), and a positive means upright (a virtual image, ). Drop the sign and you get the equation sheet’s .
Ray Diagrams for Lenses
Ray diagrams pin down the location, type, size, and orientation of a lens image. Draw any two of these three principal rays from the top of the object:
- Ray 1 (parallel ray): goes in parallel to the principal axis, then refracts through the focal point on the far side (converging lens) or looks like it came from the near-side focal point (diverging lens).
- Ray 2 (chief/central ray): goes straight through the center of the lens without bending (for thin lenses).
- Ray 3 (focal ray): passes through the object-side focal point (or, for a diverging lens, heads toward the far-side focal point), then comes out parallel to the principal axis.
Wherever the refracted rays cross (or seem to cross) is the image.
For a thin lens, draw all the bending at the lens’s midline (the vertical line through its center), not at its curved surfaces. That’s the same thin-lens model the equation uses, with and measured from the midline. To draw a lens ray diagram, mark F on both sides of the lens (and 2F, twice as far out, when it helps), draw the object as an upright arrow on the axis, trace at least two principal rays from its tip, and find where the refracted rays (or their dashed backward extensions) cross.
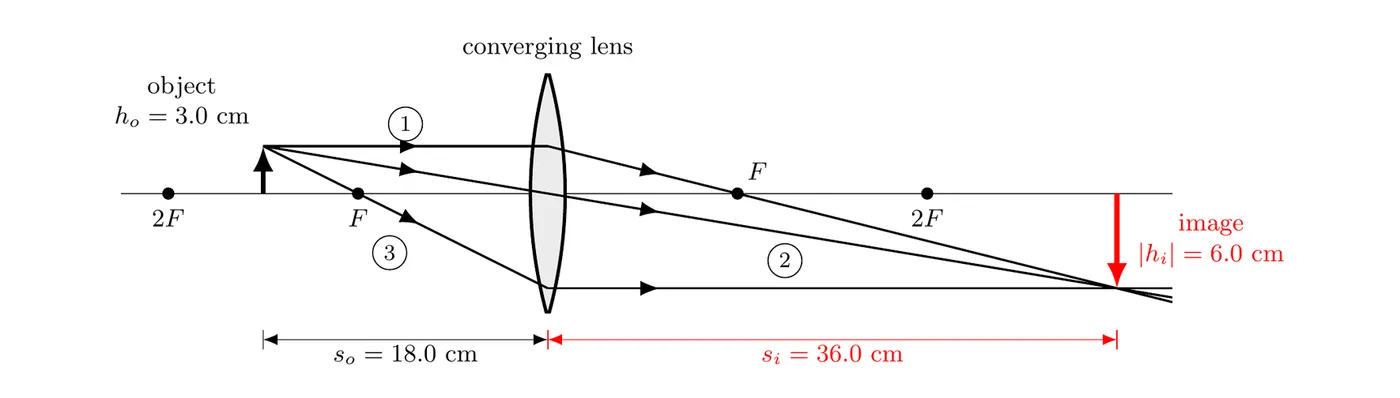
Example 1: converging lens, object between F and 2F. A 3.0 cm tall object stands 18.0 cm from a converging lens with a focal length of 12.0 cm, like a slide in a projector.
The image is 36.0 cm from the lens on the far side, so it’s real and inverted, and it’s twice as tall as the object (6.0 cm). That’s how a projector throws a big image on a screen (and why slides go in upside down). In the diagram, ray 1 comes in parallel and bends through F on the far side, ray 2 goes straight through the center, and ray 3 passes through F on the near side and comes out parallel.
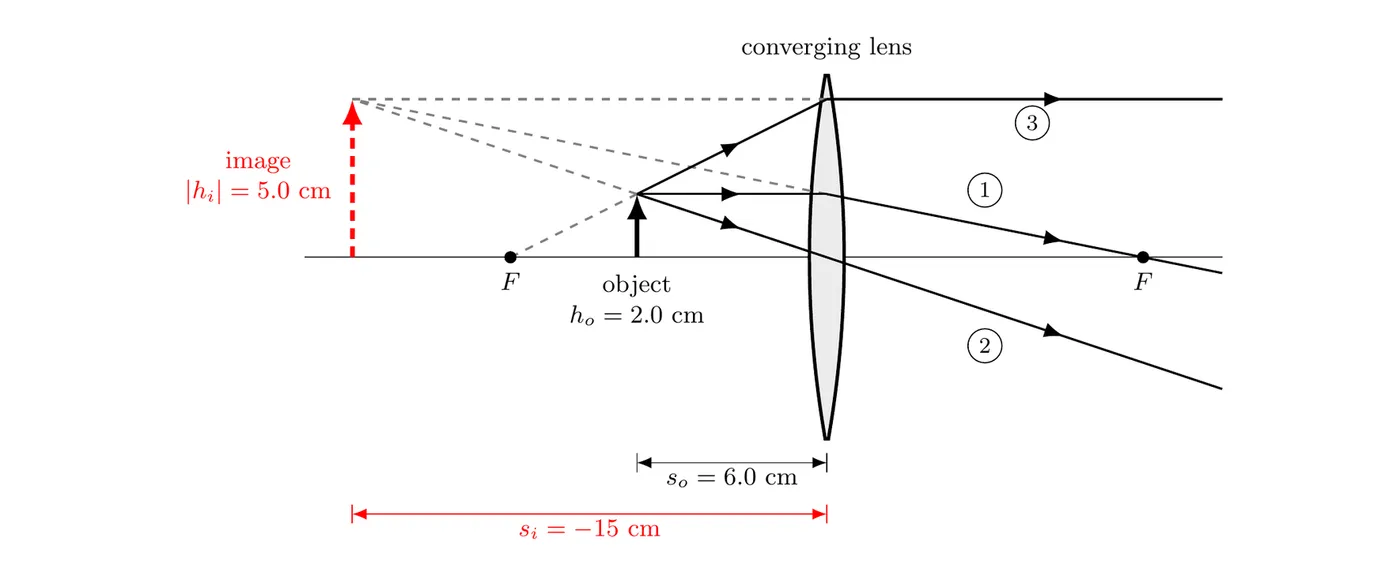
Example 2: converging lens, object inside F (magnifying glass). A 2.0 cm tall object sits 6.0 cm from a converging lens with cm.
The image is 15 cm from the lens on the same side as the object, so it’s virtual and upright, and it’s 2.5 times as tall (5.0 cm). The refracted rays spread apart on the far side, and your eye traces them back (dashed) to the enlarged image. Ray 3 here lies along the line from the near-side F through the tip of the object.
Example 3: diverging lens. A 4.5 cm tall object stands 24.0 cm from a diverging lens whose focal length has a magnitude of 12.0 cm, so cm.
The image is 8.00 cm from the lens on the object’s side: virtual, upright, and one third the object’s height (1.5 cm). It sits between the lens and F, like every image a diverging lens makes of a real object. In the diagram, ray 1 leaves as if it came from the near-side F, ray 3 aims at the far-side F (dotted) and comes out parallel, and all the dashed backward extensions meet at the image.
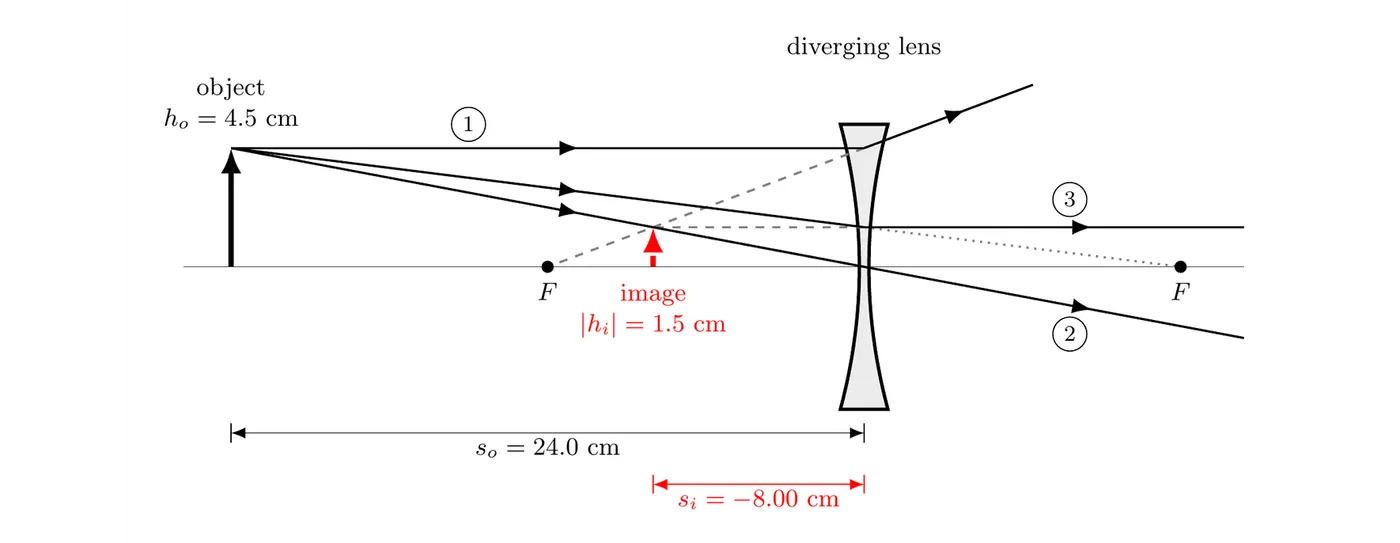
Image Characteristics
Lens images get described the same three ways. Orientation: upright (virtual images) or inverted (real images). Type: real (rays converge, projectable, opposite side from object, ) or virtual (rays only seem to diverge, same side as object, ). Size: enlarged (), same size (), or reduced ().
Summary by Lens Type
Converging (convex) lens:
- Object beyond 2F: real, inverted, reduced (image between F and 2F on the far side)
- Object at 2F: real, inverted, same size (at 2F on the far side)
- Object between F and 2F: real, inverted, enlarged (beyond 2F on the far side)
- Object at F: no image (rays come out parallel)
- Object inside F: virtual, upright, enlarged (same side as the object)
Diverging (concave) lens: for any object position, always virtual, upright, and reduced (between the lens and F on the same side as the object).
As a real object moves in from far away toward F, the real image made by a converging lens moves out from F toward infinity and keeps getting bigger. Once the object passes inside F, the image flips to virtual and upright.
Example: your eye. The lens in your eye focuses images onto the retina, so (lens to retina) stays the same. When you look at something closer, gets smaller, so gets bigger. To keep true with the same , has to get bigger, so gets shorter. Your eye muscles do this by making the lens thicker and more curved.
Finding Focal Length from Data
Another common lab: find the focal length of a converging lens.
- Line up a light source (the object), the lens, and a screen along a meter stick.
- Set an object distance bigger than (so the image is real), then slide the screen until the image on it is sharp. Record , the distance from the lens to the screen.
- Repeat for at least five object distances.
Linearize. Rearrange the thin lens equation: . That’s with and , so the graph is a straight line with slope and -intercept . (The -intercept is also .)
(m) | (m) | (m) | (m) |
0.200 | 0.590 | 5.00 | 1.69 |
0.250 | 0.380 | 4.00 | 2.63 |
0.300 | 0.297 | 3.33 | 3.37 |
0.400 | 0.243 | 2.50 | 4.12 |
0.500 | 0.212 | 2.00 | 4.72 |
0.600 | 0.201 | 1.67 | 4.98 |
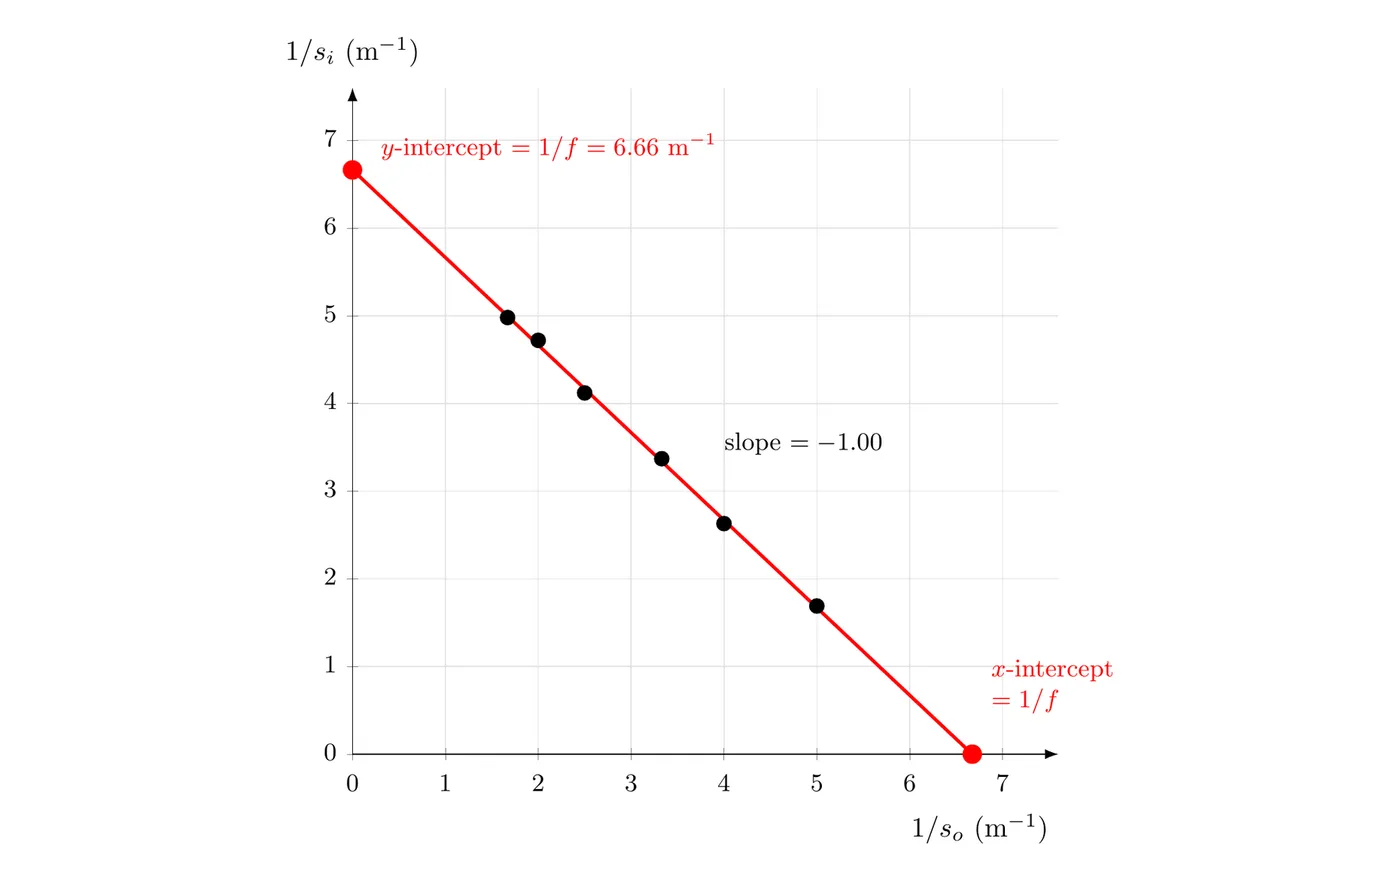
The best-fit line has a slope of , as predicted, and a -intercept of , so m cm.
Practice Problems
1. An object sits 20 cm from a converging lens with an 8.0 cm focal length.
- (a) Find the image distance.
- (b) Find the magnification.
- (c) Describe the image.
2. An object is 15 cm from a diverging lens with a focal length of magnitude 10 cm.
- (a) Find the image distance.
- (b) Find the magnification.
- (c) Describe the image.
3. A converging lens with a 12 cm focal length makes a virtual image. If the object is 6.0 cm from the lens, where’s the image?
4. A 4.0 cm tall object sits 30 cm from a converging lens with a 10 cm focal length. How tall is the image?
5. A diverging lens forms an image 8.0 cm from the lens when the object is 20 cm away. What’s the focal length?
6. Explain why a diverging lens can never form a real image of a real object.
Solutions
1. (a) Thin lens equation with cm and cm (positive, converging):
The image is 13.3 cm from the lens on the far side (positive , so real).
(b) .
(c) The image is real (, far side), inverted (real images are), and reduced (, about two-thirds size).
2. (a) Diverging lens, so cm. With cm:
The image is 6.0 cm from the lens on the same side as the object (negative , so virtual).
(b) .
(c) The image is virtual (, same side), upright (virtual images are), and reduced (40% of the object).
3. For a converging lens to make a virtual image, the object has to be inside the focal length. With cm and cm:
The image is 12 cm from the lens on the same side as the object (virtual).
4. Image distance first, with cm and cm:
Magnification:
Image height:
Since , the image is real and inverted. The image is 2.0 cm tall, inverted, half the object’s size.
5. The image is virtual (same side as the object), so cm. With cm:
The negative focal length confirms it’s a diverging lens. The focal length is cm.
6. A diverging lens spreads rays apart. Light from a real object is already spreading out, and after passing through a diverging lens it spreads even more. For a real image you’d need the refracted rays to actually converge and cross on the far side, but a diverging lens never lets that happen. Trace the diverging rays backward and they seem to come from a point on the same side as the object, which is a virtual image.
You can see it in the math too. For a diverging lens , and for a real object , so:
That makes , which means a virtual image every time.
Common Mistakes
- Mixing up lens and mirror sign conventions. For lenses, positive means a real image on the opposite side from the object. For mirrors, positive means a real image on the same side.
- Forgetting absolute values in magnification. For lenses, , always positive. Orientation comes from whether the image is real or virtual.
- Wrong focal length sign. Converging lens , diverging lens .
- Misreading real vs. virtual. Real () is on the opposite side and inverted. Virtual () is on the same side and upright.
- Bending the central ray. Ray 2 through the center of a thin lens goes straight through. Only rays 1 and 3 bend noticeably.
- Wrong path for a diverging lens. The parallel ray seems to come from the focal point on the same side as the object, not the far side.
- Thinking diverging lenses can make real images. With a real object, they always make virtual, upright, reduced images.
- Losing track of which side is which. Set a clear reference: object side vs. image side. Light travels object side to image side.
- Arithmetic slips. Use common denominators and watch the signs when solving the equation.
- Skipping the ray diagram. Diagrams help you see the setup and catch mistakes. Draw at least two principal rays.
- Forgetting the object-inside-F case. With for a converging lens, the image is virtual, upright, and enlarged, which is the magnifying-glass effect.
- Muddling image-location language. “Opposite side” means light passed through to the image (real). “Same side” means it’s back on the object side (virtual).
- Not checking image type for orientation. Real images () are inverted, virtual () are upright.
- Unit slips. Keep distances in the same units, and match heights.
- Forgetting both focal points. Lenses have one on each side, equidistant for thin lenses in air.
- Thinking the magnification sign gives orientation here. With absolute-value magnification, you get orientation separately from whether the image is real (inverted) or virtual (upright).