

2.2 - Forces and Free-Body Diagrams
What is a Force?
A force is a push or a pull on an object or system.
Every force falls into one of these two categories:
- Push: directed away from the source
- Pull: directed toward the source
Push examples: pushing a shopping cart forward, pressing down on a keyboard key, compressing a spring
Pull examples: pulling a wagon by a rope, gravity pulling objects toward Earth, tension in a cable lifting an elevator
Even forces that don’t feel like obvious pushes or pulls still fit these categories. Gravity is a pull toward Earth’s center. Friction is a push opposing motion.
Forces are Vectors
Forces are vector quantities, meaning they have both magnitude (strength, measured in Newtons) and direction (which way the force points).
Because they’re vectors, all the usual vector rules apply: forces can be broken into components, forces add using vector addition, and direction really matters, since opposite directions create opposite effects.
The Interaction Principle
This is a core idea: forces describe interactions between objects or systems. That word “interaction” is one of the most important in physics, because it means forces always involve two objects, never just one, and both participants in the interaction feel a force.
Falling object example: when a ball falls, the interaction is between the ball and Earth. Earth pulls the ball downward (gravity), and the ball pulls Earth upward with an equal and opposite force. Both the ball and Earth feel a force from each other, though Earth’s motion is far too tiny to notice given its enormous mass.
Critical rule: an object or system cannot exert a net force on itself. That’s why you can’t lift yourself by pulling up on your own shoes, why a car can’t push itself forward without pushing against the ground, and why internal forces within a system cancel out (a preview of Newton’s Third Law).
Types of Forces
Contact forces need direct physical contact between objects to occur. Examples include applied force (pushing or pulling directly), normal force (a surface pushing perpendicular to keep objects from passing through each other), friction (resistance opposing motion or attempted motion), tension (a pull transmitted through a rope or cable), spring force (push or pull from a compressed or stretched spring), and air resistance (drag from moving through air).
Where contact forces really come from: at the atomic level, nothing actually touches. When a book rests on a table, the electrons in the book’s atoms and the table’s atoms repel each other through electric forces. Add up an enormous number of those tiny interatomic electric forces and you get the normal force. Friction, tension, and spring forces work the same way: they’re all the large-scale (macroscopic) result of electric forces between atoms. That’s also why a table pushes back harder when you press down harder: its atoms get squeezed slightly closer together and repel more strongly.
Field forces, also called non-contact forces, act at a distance through an invisible field, no touching required. Examples include gravitational force (attraction between masses through a gravitational field), electromagnetic force (attraction or repulsion between charged particles or magnets), and nuclear forces (the strong and weak forces inside atoms, not usually covered in AP Physics 1).
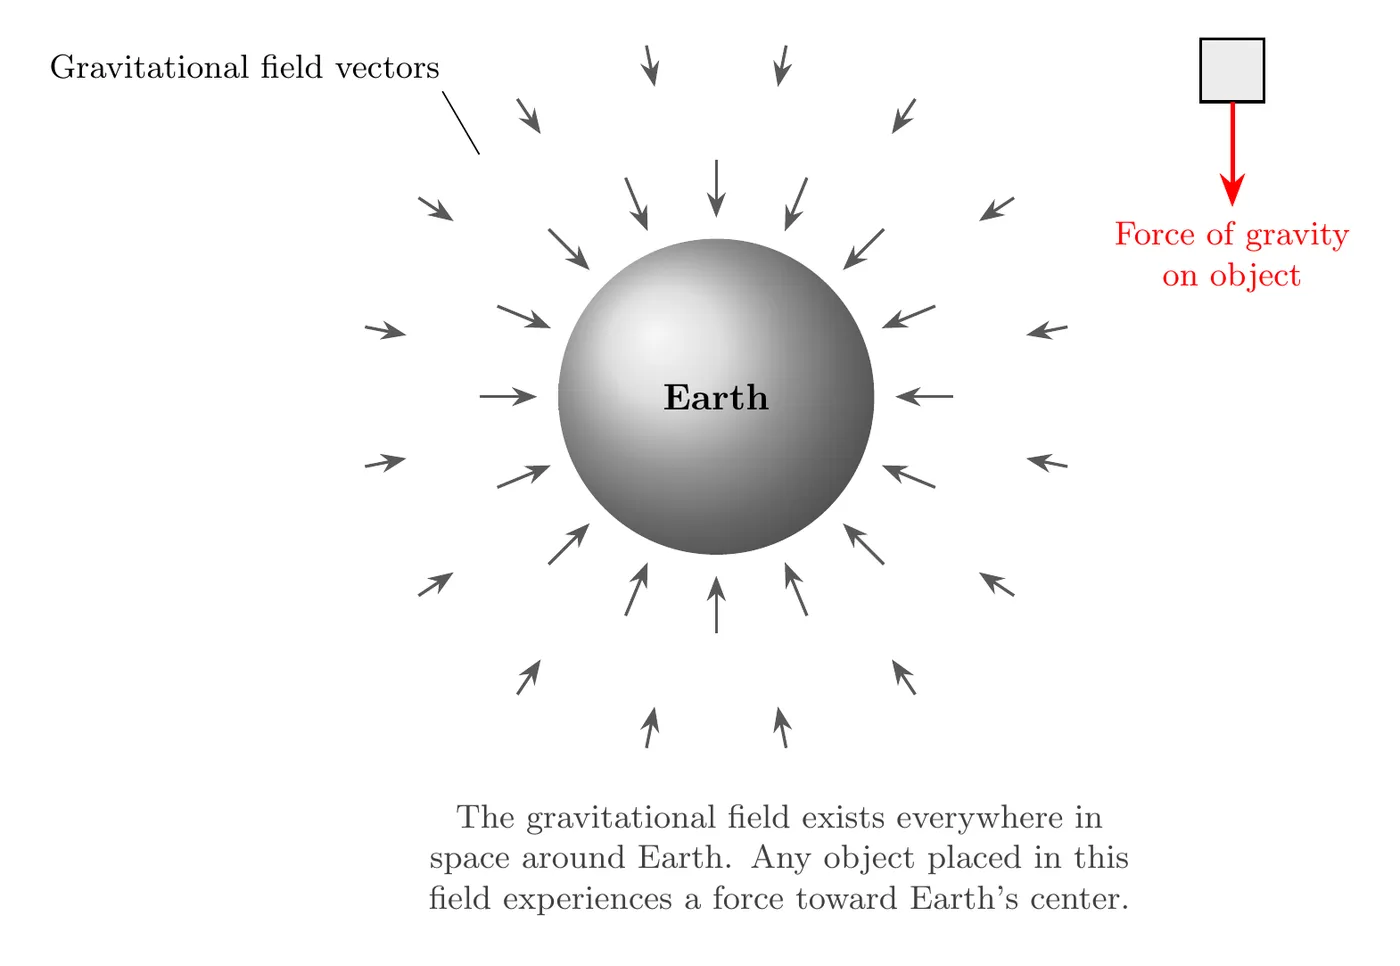
Each arrow shows the direction gravity would pull something placed at that spot. The field exists whether or not anything is there, the force only kicks in once an object enters the field.
In AP Physics 1, gravity is the only force that acts at a distance. Electric and magnetic forces between objects are saved for AP Physics 2. So if two objects in an AP Physics 1 problem aren’t touching, the only force between them is gravitational.
The Draw, Sum, Solve Strategy
Force problems follow a consistent three step process:
- Draw: create a free body diagram showing all forces acting on the object
- Sum: apply Newton’s Second Law to sum the forces and relate them to acceleration, (covered in detail in the next section)
- Solve: use algebra, trig, and kinematics to find the unknowns
Sticking to this structure reduces errors, keeps complex problems organized, and earns partial credit on exams even when the final answer ends up wrong.
Free Body Diagrams
A free body diagram (FBD) is a simplified picture showing the object of interest (usually just a dot or simple shape), every force acting on that object drawn as an arrow, and a label for each force.
FBDs help you visualize every force at once, organize your thinking before solving, identify components and directions clearly, and avoid missing a force by accident.
The critical thing to remember: FBDs show forces acting on the object, not forces the object exerts on other things.
How to draw one:
- Isolate the object: draw it as a simple shape, box, circle, or dot, and remove everything else from the picture
- Identify all the forces: ask what’s touching this object (contact forces) and what fields are affecting it (field forces)
- Draw the force vectors: each force is an arrow from the object’s center, arrow length shows relative strength, arrow direction shows the direction, and each one gets labeled
- Double check: make sure you haven’t included forces the object exerts on other things, motion vectors like velocity or acceleration (those aren’t forces), or “ma” as if it were a force (it’s the result of net force, not a force itself)
Example: Sled Pulled at an Angle
A person pulls a sled across horizontal ground with a rope making a 40° angle above horizontal. The applied force through the rope is called .
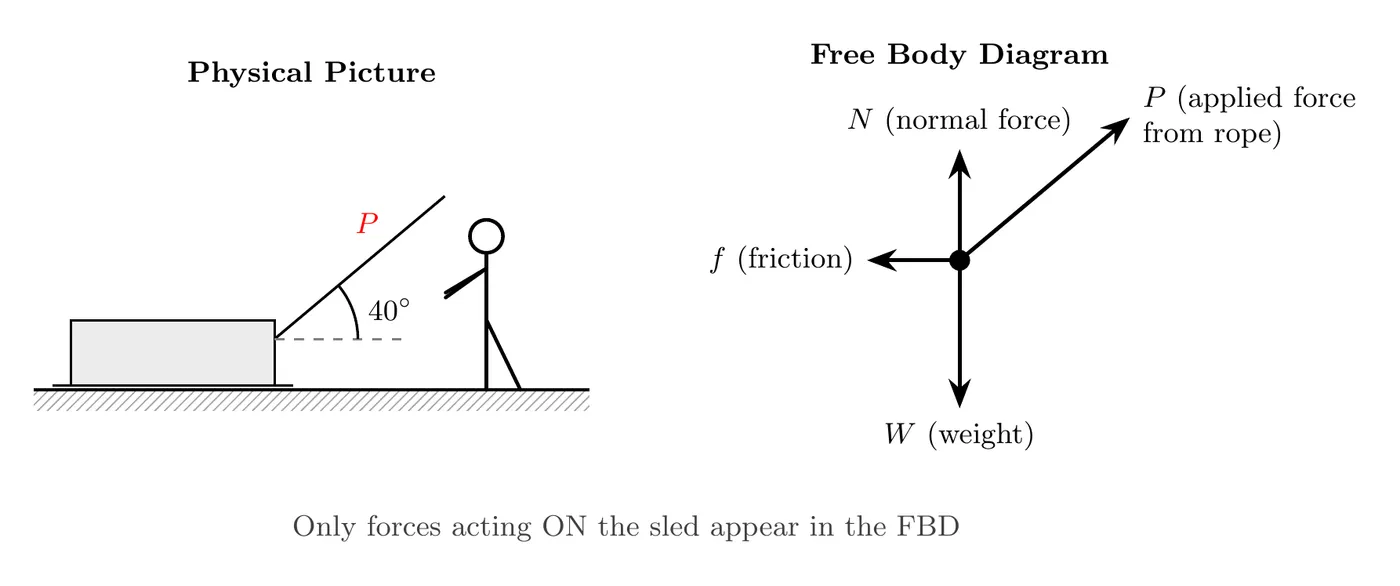
The forces identified here are (applied force from the rope, contact force at 40°), (weight/gravity, field force, downward), (normal force from the ground, contact force, upward), and (friction from the ground, contact force, opposing motion).
What’s left out: the force the sled exerts on the ground, the force the sled exerts on the rope, the person doing the pulling, and any velocity or acceleration.
Resolving Forces into Components
Forces at an angle often need to be broken into perpendicular components, usually horizontal and vertical.
For a force at angle above horizontal:
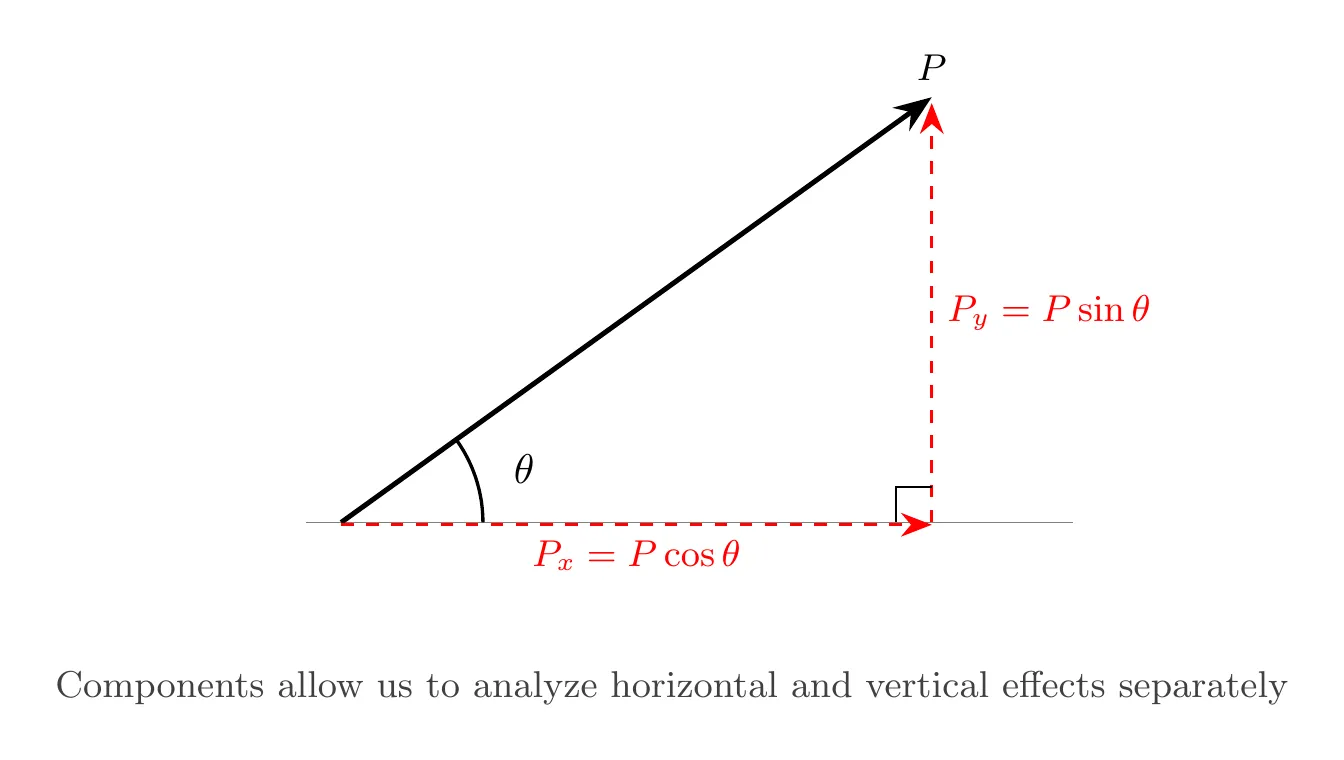
Important rule for AP scoring: on a free body diagram, draw only the original force vectors, never draw the component arrows on the FBD itself. Show components in a separate work area, or in the equations when you’re solving, but never on the diagram that gets scored.
The reasoning is that breaking a force into components is a math tool for solving, not an extra force. Drawing components right on the FBD makes it look like you’re double counting forces.
A clean workflow: draw the FBD with only the original forces, then in a separate area resolve any angled forces into components, then use those components in your equations.
More AP drawing rules: draw the object or system as a dot at its center of mass, and treat it as if all of its mass were at that dot. Each force gets its own straight arrow that starts on the dot and points in the direction of the force. If two forces point the same way (say, two ropes both pulling right), draw them side by side, each starting on the dot, not on top of each other, so the grader can see both.
Choosing Your Axes
Before turning an FBD into equations, pick a coordinate system with one axis parallel to the direction the object accelerates (or would accelerate). Then the acceleration only shows up in one equation, and the other direction is just balanced forces. For something sliding along a level floor, that’s the usual horizontal and vertical axes. For a block on a ramp, tilt the axes so runs along the ramp’s surface and is perpendicular to it: the block can only accelerate along the ramp, so . This tilted setup is worked out step by step in 2.5.
Worked Example: From FBD to Equations
A 5.00 kg box slides to the right across a level floor. Two ropes pull it to the right, one with 12.0 N and one with 8.00 N, and kinetic friction from the floor is 15.0 N. Use . Draw the free body diagram, then find the normal force and the net force on the box.
Draw: the forces on the box are its weight (down), the normal force from the floor (up), friction (left, opposing the sliding), and the two rope forces (right). The two rope forces point the same way, so they’re drawn side by side, not combined into one arrow.
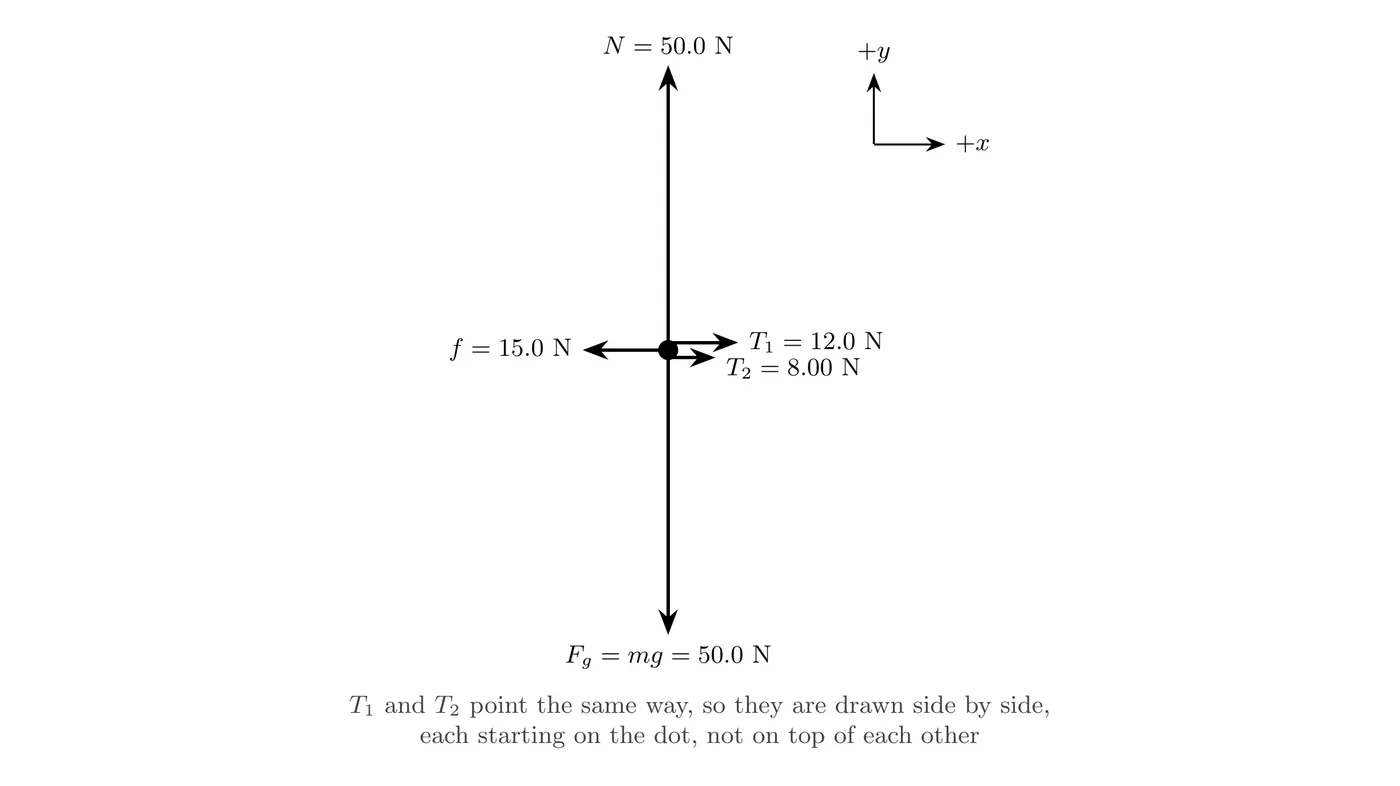
Axes: the box can only accelerate along the floor, so take to the right and up.
Sum, y-direction: the box doesn’t move up or down, so the vertical forces balance:
Sum, x-direction:
The net force is 5.0 N to the right, so the box speeds up to the right. In 2.5, Newton’s Second Law turns this into an acceleration: .
What Belongs on an FBD
Include: every contact force acting on the object, every field force acting on the object, clear labels, arrows showing direction, and relative magnitudes (longer arrow means stronger force).
Leave out: motion quantities like velocity or acceleration (not forces), forces the object exerts on other things, “ma” treated as a force, component arrows on the scored FBD, internal forces if you’re analyzing a system as a whole, and any object other than the one you’re analyzing.
Common FBD Scenarios
Object at rest on a surface: weight (down), normal force (up)
Object sliding on a surface: weight (down), normal force (up), friction (opposing the direction of motion), and applied force if something is pushing or pulling it
Object hanging from a string: weight (down), tension (up along the string)
Object on an incline: weight (still straight down, not perpendicular to the surface), normal force (perpendicular to the surface), friction (along the surface, opposing motion)
Key Takeaways
- A force is a push or pull on an object
- Forces are vectors, meaning they have magnitude and direction
- Forces describe interactions between two objects or systems
- An object can never exert a net force on itself
- Contact forces need physical touching (normal, friction, tension, applied)
- Field forces act at a distance without contact (gravity, electromagnetic)
- Problem-solving strategy: Draw (FBD), Sum (forces), Solve (algebra)
- A free body diagram shows all forces acting on an object, and visualizes the whole situation
- FBDs include only forces, never motion quantities or forces the object exerts elsewhere
- Draw the object isolated as a dot or shape, with forces as labeled arrows from the center
- Component resolution breaks angled forces into perpendicular parts: ,
- Never draw components on the scored FBD for AP exams, show them separately
- Verify your FBD by checking every touching object (contact) and every field (non-contact)
- “Interaction” is the key word, every force involves two participants
- Contact forces are the large-scale result of electric forces between atoms
- In AP Physics 1, gravity is the only force that acts at a distance
- On an FBD, each force is its own straight arrow starting on the dot, and forces in the same direction go side by side
- Choose one axis along the direction of acceleration (along the surface for an incline)